 ENGLISH -
  DEUTSCH ENGLISH - DEUTSCH
In 2017, it was possible via the myaudi.com website to upload custom POIs
(waypoints) including icons (e.g. geocaches)
which could then be directly loaded onto the vehicle into the MMI. Unfortunately,
Audi simply stopped this functionality - if I remember correctly - in 2018.
:-(
Recently I discovered on a website a
Perl script named Audi_Export.pm written and documented by
Martin Oldfield.
This script has now been adapted with the help of
ChatGPT and modified
so that it writes POIs (Audi special destinations) via the Perl script
run_audi_export.pl into a suitable file structure, which, for example, can be copied onto a
USB stick and then read into the MMI of an Audi A5 from 2017.
I would like to maintain a list of all Audi/MMI models for which the software presented here has worked. I rely on feedback from users. The community (and I) would greatly appreciate it if you could send an email to me upon success + (or failure -):
- Audi model
- Model year
- MMI type
Please email to urs - ideally with the subject "zeugma Audi POI". The word "zeugma" in the subject line ensures that the email is immediately let through by the spam filter. Thank you!
CONFIRMED  TYPE         MODEL YEAR   MMI
    +      Audi A5      2017         MMI Navigation System plus with MMI touch

    ?      Audi A5      2018         MMI Navigation System plus with MMI touch
    ?      Audi A5      2019         MMI Navigation System plus with MMI touch
    ?      Audi A6      2016         MMI Navigation System plus with MMI touch
    ?      Audi A6      2017         MMI Navigation System plus with MMI touch
    ?      Audi A6      2018         MMI Navigation System plus with MMI touch
    ?      Audi A6      2019         MMI Navigation System plus with MMI touch
    ?      Audi TT      2015         MMI Navigation System plus with MMI touch
    ?      Audi TT      2016         MMI Navigation System plus with MMI touch
    ?      Audi TT      2017         MMI Navigation System plus with MMI touch
    ?      Audi TT      2018         MMI Navigation System plus with MMI touch
    ?      Audi TT      2019         MMI Navigation System plus with MMI touch
    ?      Audi Q2      2017         MMI Navigation System plus with MMI touch
    ?      Audi Q2      2018         MMI Navigation System plus with MMI touch
    ?      Audi Q2      2019         MMI Navigation System plus with MMI touch
    ?      Audi Q5      2017         MMI Navigation System plus with MMI touch
    ?      Audi Q5      2018         MMI Navigation System plus with MMI touch
    ?      Audi Q5      2019         MMI Navigation System plus with MMI touch
    ?      Audi R8      2016         MMI Navigation System plus with MMI touch
    ?      Audi R8      2017         MMI Navigation System plus with MMI touch
    ?      Audi R8      2018         MMI Navigation System plus with MMI touch
    ?      Audi R8      2019         MMI Navigation System plus with MMI touch
The following software has been set up on a Raspi 4B. The following programs had to be installed in addition to gfortran and perl:
sudo apt-get update
sudo apt-get install sqlite3
sudo apt-get install libconfig-yaml-perl
sudo apt-get install cpanminus
sudo cpanm Crypt::Digest::SHA1
sudo cpanm Date::Calc
sudo cpanm Perl6::Slurp
sudo cpanm Archive::Zip
sudo cpanm DBD::SQLite
sudo cpanm XML::LibXMLXML
sudo cpanm Text::CSV
The desired file structure for this software looks as follows (Directories are italicized and bold displayed):
$HOME/Audi_POIs
   run_audi_export.pl
   Audi_Export.pm
   query_poidata.pl
   USB-Stick  (entire directory will be created later through the Perl scripts)
   data
      GPX2CSV.sh
      shortenGPX.f
      fav2csv.f
      Tradis.gpx     (Output from program GSAK)
      MyFinds.gpx    (Output from program GSAK)
      Favoriten.gpx  (File from the Garmin GPS with Filename Current.gpx --> rename to Favoriten.gpx)
       The example coordinates in the three *.gpx files are at
       lat="47.0" lon="8.0"
       lat="47.01" lon="8.01"
       lat="47.02" lon="8.02
   icons
      Tradis.png
      MyFinds.png
      Favoriten.png
This file structure can be set up using the following commands:
cd $HOME
mkdir Audi_POIs
cd Audi_POIs
mkdir data
mkdir icons
cd $HOME/Audi_POIs
(store the three linked Perl scripts here)
cd data
(store the linked Shell script, the two Fortran programs,
 and the three linked *.gpx files here)
chown u+x GPX2CSV.sh
gfortran -o shortenGPX.exe shortenGPX.f
gfortran -o fav2csv.exe fav2csv.f
cd ../icons
(store the three linked *.png files here)
For a first test, I recommend using the *.gpx files as linked above to test the software. Later, you can use your own *.gpx files, which you have obtained using the software GSAK.
cd $HOME/Audi_POIs
cd data
./GPX2CSV.sh
cd ..
perl run_audi_export.pl
Depending on the number of POIs, this process can take varying amounts of time. On my Raspi 4B with 8 GB RAM, it takes about 11 minutes for approximately 3900 POIs and about 25 minutes for approximately 19000 POIs. With 27000 POIs it took about 32.5 minutes.
With the following steps, data can be copied from the PC to the USB drive:
- Insert USB stick
- Format USB stick (max. 32 GB !!) with FAT32   (only the first time)
- Find out the path to the USB stick using the command
  df -h. In this example:  /media/$USER/FAEC-A544
rm -R /media/$USER/FAEC-A544/*
cd USB-Stick
cp -rp * /media/$USER/FAEC-A544
umount /media/$USER/FAEC-A544
- Remove USB stick
The following steps can be used to import data from the USB drive into the MMI:
- Turn on the ignition
- Insert the USB drive into the Audi (USB port 1 or 2)
  (should USB port 2 not work, try USB port 1 !)
- Wait until the navigation system is initialized
- Push the "NAV/MAP" slider up
- Press the silver button to the left of the wheel
- Select "Special Destinations"
- Press the silver button to the right of the wheel
- Select "Import myAudi Special Destinations"
- "USB" should appear in white --> select it
- Follow the instructions on the display
Note: After importing the new POIs, they are usually not immediately visible in the correct format in the MMI! Even a brief on and off of the ignition does not help. The car should be switched off for so long until the navigation system is reinitialized upon switching on. Only then does the view look like the image below:
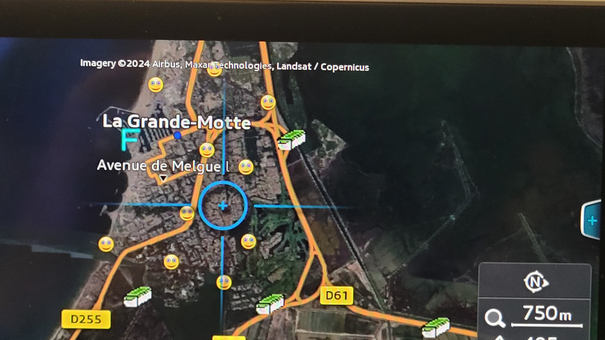
On the left, you can see a favorite (a former hotel) in light blue,
on the right and below are some
Tradis (Traditional Caches) in green and white, and next to them
several caches of the type MyFinds (Smileys). The latter are also
represented in the
size 44x44 pixels, however, the symbol is centered and reduced to 22x22px
so they do not dominate the image significantly.
PS: Audi special destinations are only visible from a zoom level of 750m or less (see in the photo above, right bottom).
The simplest way to transfer additional types of caches or other types of POIs
(campgrounds, charging stations, speed cameras, etc.) into the MMI without
modifying the software is to replace, for example, the Tradis.CSV file in
the data directory with a file of the same name but different content.
It is important, however, that in the format
lat,lon,name the "name" does not start with a
quotation mark (") as the database in the Audi does not like this. In such
cases, the quotation mark (") should be replaced with an apostrophe (').
In the icons directory, if desired, the Tradi.png image can then be
replaced with another image of the same name and size of 44x44 pixels.
It is not absolutely necessary to have three *.CSV files (Tradis.CSV,
MyFinds.CSV, and Favoriten.CSV); if one or two of these files are missing, the
software will issue a message but will continue with the next file.
Once the *.CSV and *.png files are ready, the software can be started using:
perl run_audi_export.pl
Good luck and have fun!